> ## Documentation Index
> Fetch the complete documentation index at: https://docs.daven.ai/llms.txt
> Use this file to discover all available pages before exploring further.
# Cine Master
**🎬 Daven AI – Cine Master Shot usage guide**
**You can find the app here.** [https://daven.ai/apps](https://daven.ai/apps)
**🎥 Cine Master Shot** is a high-performance image generation and editing tool that precisely controls real film equipment (camera, lenses), lighting, and exposure to produce a single professional-grade cinematic image.
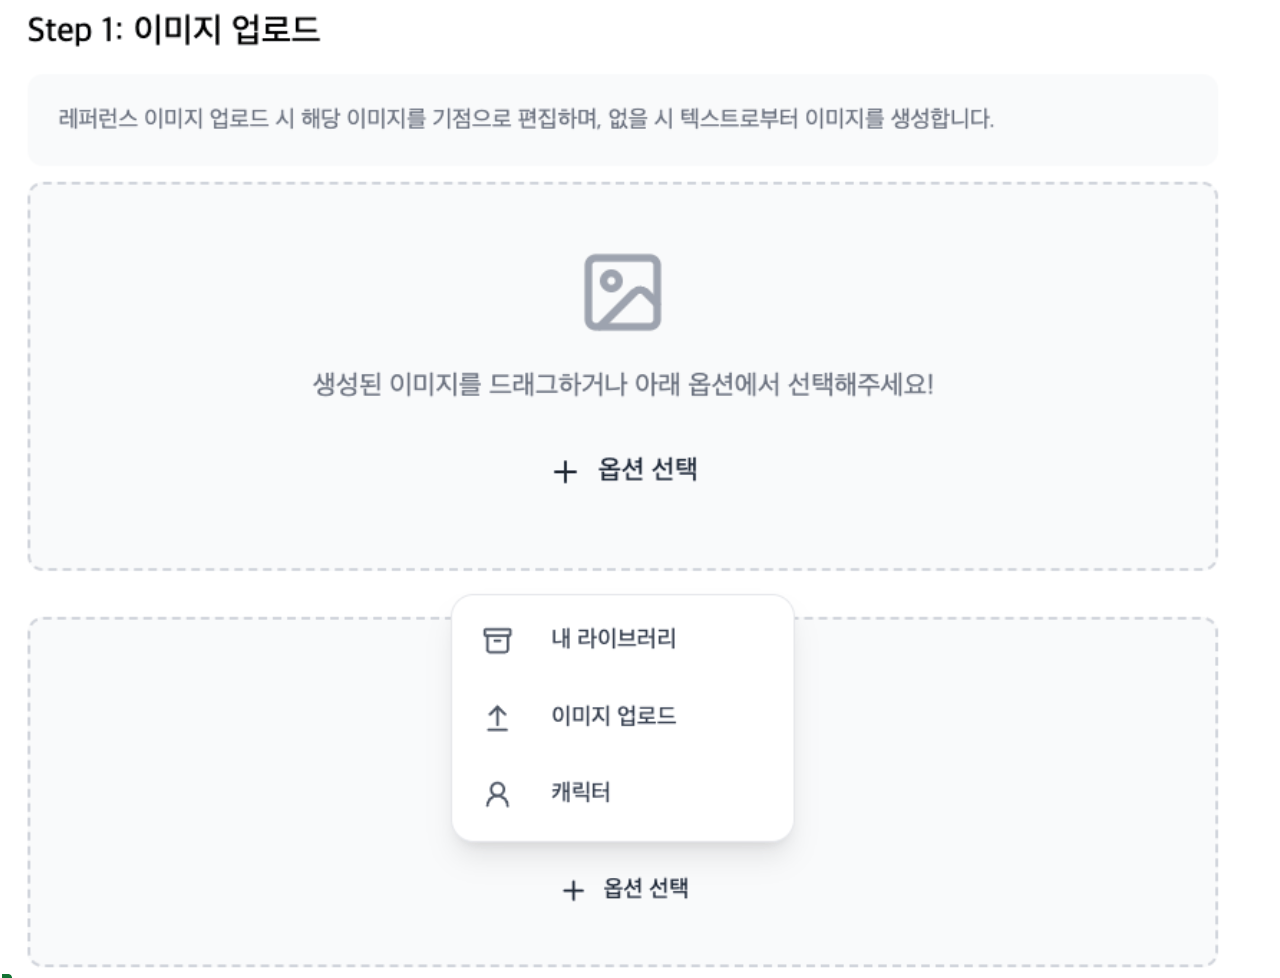
## Step 1: Upload image
\* **Use a reference image**: Upload the image that will be the basis for editing. If you don't have one, a new image is generated from your text.
\* **Upload method**: You can add up to 10 reference images by dragging generated images or using the **\\\[+ Select option\\]** button.
 ## Step 2: Cinematography (Camera and lens settings)
Choose the characteristics of professional film equipment to define the look and composition of the image.
## Step 2: Cinematography (Camera and lens settings)
Choose the characteristics of professional film equipment to define the look and composition of the image.
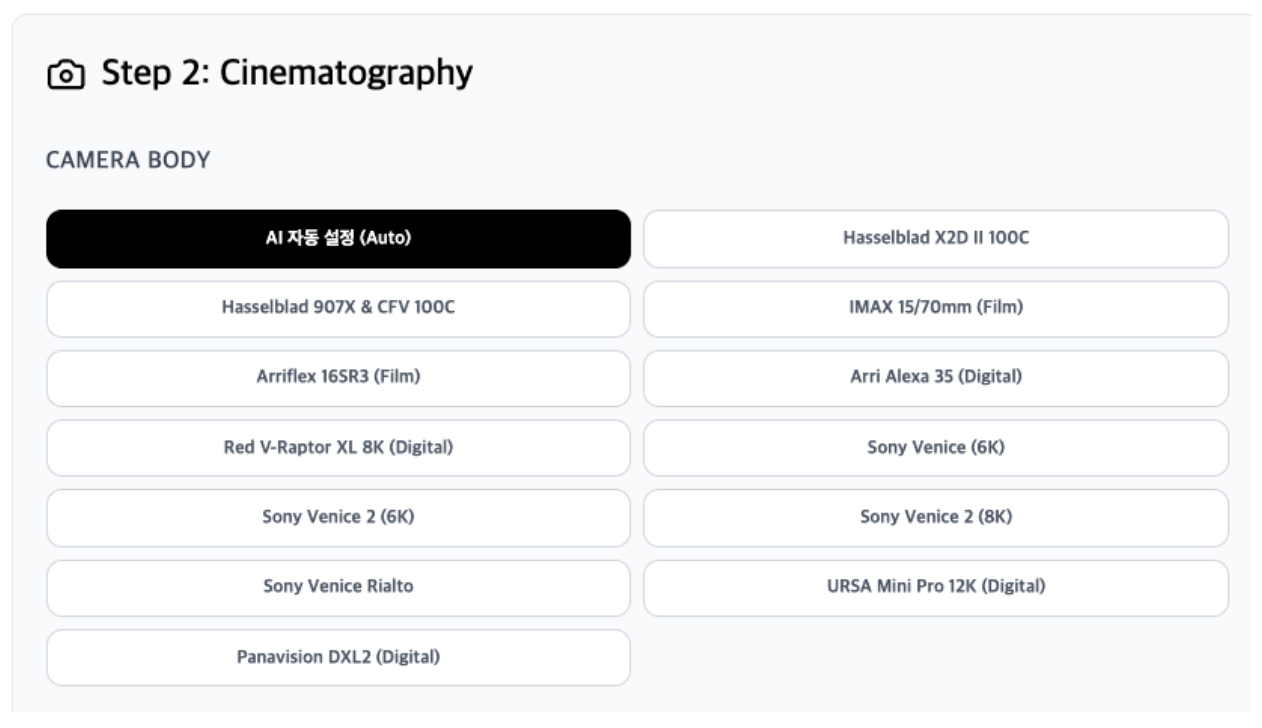 \* **CAMERA BODY**: You can select high-end camera bodies used in real film production, such as **Hasselblad X2D**, **IMAX 70mm**, **Arri Alexa 35**, **Sony Venice 2**. (Use **AI auto** if unsure.)
\| No. | Camera model | Key traits | Best for (recommended cases) | Example shot |
\| :---- | :---- | :---- | :---- | :---- |
\| **01** | **AI auto** | AI-optimized algorithm | Clean results without complex setup | Daily vlog, café scene |
\| **02** | **Hasselblad X2D II** | 100MP, extreme sharpness | Fashion shoots, maximum detail | Model pores, eye catchlights |
\| **03** | **Hasselblad 907X** | Classic look, rich color | Antique spaces, static art film | Elder in an old study |
\| **04** | **IMAX 15/70mm** | Massive resolution, scale | Blockbusters, nature, spacecraft | Epic mountain peak shot |
\| **05** | **Arriflex 16SR3** | 16mm film grain | Perfume, flashback, documentary | Kids in a '90s alley |
\| **06** | **Arri Alexa 35** | Natural skin tones | **Cinematic standard**, safe choice | Protagonist on a rainy street |
\| **07** | **Red V-Raptor XL** | Strong contrast, modern 8K | Action, sci-fi, sleek ads | Cyberpunk city chase |
\| **08\~10** | **Sony Venice series** | Low noise, excellent color | Night scenes, low light | Explorer in a dark cave |
\| **11** | **Sony Venice Rialto** | Detachable sensor, compact | Tight interiors, dynamic close-ups | Fight inside a cockpit |
\| **12** | **URSA Mini Pro 12K** | Ultra-high resolution (12K) | Landscapes, crowds, heavy post | Stadium with thousands |
\| **13** | **Panavision DXL2** | Hollywood legend color | Soft, epic blockbuster feel | Army advancing at sunset |
**🔍 Cine Master Shot: Main optical lenses guide**
\* **Zeiss Ultra Prime**: Peak German optics; very sharp and cool. Low distortion, ideal for modern architecture and clean city backgrounds.
\* **Example**: "Businessman with a cold expression in a city full of glass buildings."
\* **Cooke S4/i**: The legendary "Cooke Look." Warm, soft skin rendering; beloved for character-driven drama.
\* **Example**: "Family smiling in a living room lit by warm sunlight."
\* **Panavision C-Series**: Iconic anamorphic Hollywood lenses. Oval bokeh and horizontal blue flare.
\* **Example**: "Action movie scene with car headlights stretching horizontally at night."
\* **Canon K-35**: Vintage 70s–80s feel. Soft light bloom and dreamy mood.
\* **Example**: "Lovers dancing in a hazy sunset meadow."
\* **Helios 44-2 / Petzval 85mm**: Swirling "vortex" bokeh. For highly artistic, distinctive looks.
\* **Example**: "Mystical, dreamy scene of a fairy appearing in a forest."
**🔍 Cine Master Shot: Optical lens reference**
\| Lens category | Lens model | Main traits and recommended use |
\| :---- | :---- | :---- |
\| **Digital precision** | **Arri Signature / Zeiss Ultra Prime** | Sharp, modern texture, when you need realistic rendering |
\| **Portrait & drama** | **Cooke S4/i / Canon K-35** | Soft skin tones, warm feel, character monologues |
\| **Cinematic anamorphic** | **Panavision C-Series / Hawk V-Lite** | Oval bokeh, cinematic flare, wide scale |
\| **Artistic & special** | **Lensbaby / Helios 44-2 / Petzval** | Swirl bokeh, intentional distortion, dreamlike mood |
\| **Hasselblad only** | **XCD series (90mm V / 38/55mm V etc.)** | Maximum resolution when paired with Hasselblad body |
\| **Special purpose** | **Laowa Macro** | Extreme close-ups of small objects or eyes |
**📏 Cine Master Shot: Focal length guide**
You can choose from 8mm (ultra-wide) to 200mm (telephoto), or enter a value directly.
\| Type | Value | Visual effect (usage) | Example shot |
\| :---- | :---- | :---- | :---- |
\| **AI auto** | **AUTO** | AI analyzes scene and composition for optimal focal length | For new directors or quick drafts |
\| **Ultra-wide** | **8mm** | Extremely wide view, distortion for dramatic space | Cathedral interior, vast planet |
\| **Wide** | **18mm** | Landscape and people with strong sense of space | Tense room, city establishing shot |
\| **Standard-wide** | **35mm** | Slightly wider than human vision, natural storytelling | Street snap, full-body shot |
\| **Standard** | **50mm** | Closest to human perspective, honest depiction | Everyday life, dialogue |
\| **Short tele** | **85mm** | Portrait standard; soft background (bokeh), clear features | Emotional close-up, interview |
\| **Telephoto** | **200mm** | Compress distance, pull subject and background together | Sports expression, sniper POV, paparazzi |
\| **Custom** | **Direct input** | Fine-tune angle between the above values | When you want 45mm, 135mm, etc. |
**💡 Director tip: "Widen the space or narrow the emotion"**
\* For **grandeur of space**, choose **18mm or shorter**. Background recedes and the subject looks smaller while the world feels huge.
\* To focus on **character emotion or beauty**, choose **85mm or longer**. Background blurs and only the person holds the viewer's attention.
## Step 3: Lighting Style
After setting the gear, the most important step is designing the light. The lighting style can make the scene feel like a thriller or a romance.
Choose a lighting preset that defines the mood.
* **Natural light**: Natural, Golden hour, Blue hour
* **Studio**: Softbox, Backlight, Cinematic
* **Mood & color**: Moody, High key / Low key, Amber / Crimson / Emerald, etc.
* **Special effects**: Volumetric, Black & white
\| Lighting style | Traits and emotion | Director's recommended scene (example) |
\| :---- | :---- | :---- |
\| **Natural** | Real-world light, realistic and comfortable | Documentary-style, peaceful afternoon |
\| **Golden hour** | Warm, golden sunset light; romance and nostalgia | Lovers parting or reuniting, beautiful flashback |
\| **Blue hour** | Cold, still blue after sunset or at dawn; solitude | Lonely walk at dawn, cold mystery |
\| **Backlight** | Strong light behind subject; rim or silhouette | Hero's entrance, mysterious figure |
\| **Softbox** | Soft, even light; minimal shadow, flattering | Beauty close-up, interview |
\| **Cinematic** | Classic film lighting; balanced contrast | Dramatic conflict, general feature look |
\| **Moody** | Dark, heavy; strong shadows for inner psychology | Crime thriller, character in distress |
\| **High key** | Overall bright, minimal shadow, positive energy | Comedy, fairy-tale mood, hopeful morning |
\| **Low key** | Most of frame dark, specific areas lit; tension | Noir, horror moment |
\| **Volumetric** | Light rays in air; mysterious and dimensional | Light through fog in forest, light through church window |
\| **Color filter (amber/red/etc.)** | Tinted light for distinct mise-en-scène (e.g. crimson for intensity) | Cyberpunk (violet), war/anger (red), sci-fi (emerald) |
\| **Black & white** | No color, only contrast and texture; classic and artistic | Classic film homage, philosophical scene |
## Step 4: Exposure settings
Adjust brightness and depth of field for the image.
Exposure is not just brightness—it completes the "physical texture" of the image.
* **Aperture**: Controls background blur (depth of field).
* **Shutter**: Controls motion blur or sharpness.
* **ISO**: Sensitivity; fine-tune overall brightness.
\_※ Click the \_\*\\\[AUTO\\]\*\* button next to each setting for AI to compute optimal values.
**📸 Cine Master Shot: Exposure settings guide**
\| Setting | Role (in director terms) | Effect | Example |
\| :---- | :---- | :---- | :---- |
\| **Aperture** | **"Where the eye focuses"** | **Low (F1.4\~2.8)**: Soft background, subject stands out **High (F8\~11)**: Sharp from subject to background | **F1.8**: Single tear on protagonist **F11**: Full detail of a huge wall |
\| **Shutter** | **"Movement in time"** | **Fast (1/1000)**: Freeze the moment **Slow (1/30)**: Motion blur, dreamy | **1/500**: Explosion debris **1/15**: Soft blur of dancer under streetlight |
\| **ISO** | **"Sensitivity to light"** | **Low (100\~400)**: Clean, sharp **High (1600+)**: Bright in dark (more noise) | **ISO 100**: Beach at noon **ISO 3200**: Dark dungeon |
**🛠️ How to use exposure**
1. **\\\[AUTO\\]**: If you're unsure about the exposure triangle, click **\\\[AUTO\\]** next to each setting. AI balances values for your lighting and lens.
2. **Cheat sheet preview**: Use **\\\[Cheat sheet preview\\]** (top right) to see how current settings affect the image.
3. **Sliders**: Move sliders to fine-tune brightness and depth of field.
**💡 Director tip: Settings by situation**
* **Emotional portrait**: Open aperture to **F1.4**, **ISO 200** for clean image. Background melts away; only the face stands out.
* **Fast chase**: Set shutter to **1/1000** or faster for sharp action.
* **Gritty noir**: Raise **ISO** for grain, or slow shutter for uneasy mood.
**🎞️ Cine Master Shot: Final step**
## Step 5. Output settings & custom prompt
* Set the "frame" of the scene and give the AI final creative notes.
**Aspect ratio**: Choose a frame that fits the genre.
**16:9 (Landscape)**: Standard cinematic widescreen; ideal for wide backgrounds or dialogue.
**Resolution**: Determines sharpness of the result.
**1K (HD)**: Good for quick previews and web sharing.
**Custom prompt**: Add creative details—costume, action, weather—beyond the technical setup.
* **Director example**: "Man in a torn leather jacket," "Falling snow," "Strong neon sign light."
* **Batch number**: How many images to generate per click.
* Generating several at once and picking the best is a common workflow, but it uses more tokens.
**"The camera is ready and the light is set. Time to hit Generate."**
## Step 6. Generate
When everything is set, click the black **\\\[Generate\\]** button at the bottom.
**📊 Output settings summary**
\| Item | Options | Recommended use |
\| :---- | :---- | :---- |
\| **Aspect ratio** | 16:9 / 1:1 etc. | Cinematic (16:9), SNS/poster (1:1) |
\| **Resolution** | 1K (HD) etc. | Quick preview and digital sharing |
\| **Custom prompt** | Free text | Final creative direction to the AI |
\| **Batch number** | Number | When selecting the best from several variants |
\* **CAMERA BODY**: You can select high-end camera bodies used in real film production, such as **Hasselblad X2D**, **IMAX 70mm**, **Arri Alexa 35**, **Sony Venice 2**. (Use **AI auto** if unsure.)
\| No. | Camera model | Key traits | Best for (recommended cases) | Example shot |
\| :---- | :---- | :---- | :---- | :---- |
\| **01** | **AI auto** | AI-optimized algorithm | Clean results without complex setup | Daily vlog, café scene |
\| **02** | **Hasselblad X2D II** | 100MP, extreme sharpness | Fashion shoots, maximum detail | Model pores, eye catchlights |
\| **03** | **Hasselblad 907X** | Classic look, rich color | Antique spaces, static art film | Elder in an old study |
\| **04** | **IMAX 15/70mm** | Massive resolution, scale | Blockbusters, nature, spacecraft | Epic mountain peak shot |
\| **05** | **Arriflex 16SR3** | 16mm film grain | Perfume, flashback, documentary | Kids in a '90s alley |
\| **06** | **Arri Alexa 35** | Natural skin tones | **Cinematic standard**, safe choice | Protagonist on a rainy street |
\| **07** | **Red V-Raptor XL** | Strong contrast, modern 8K | Action, sci-fi, sleek ads | Cyberpunk city chase |
\| **08\~10** | **Sony Venice series** | Low noise, excellent color | Night scenes, low light | Explorer in a dark cave |
\| **11** | **Sony Venice Rialto** | Detachable sensor, compact | Tight interiors, dynamic close-ups | Fight inside a cockpit |
\| **12** | **URSA Mini Pro 12K** | Ultra-high resolution (12K) | Landscapes, crowds, heavy post | Stadium with thousands |
\| **13** | **Panavision DXL2** | Hollywood legend color | Soft, epic blockbuster feel | Army advancing at sunset |
**🔍 Cine Master Shot: Main optical lenses guide**
\* **Zeiss Ultra Prime**: Peak German optics; very sharp and cool. Low distortion, ideal for modern architecture and clean city backgrounds.
\* **Example**: "Businessman with a cold expression in a city full of glass buildings."
\* **Cooke S4/i**: The legendary "Cooke Look." Warm, soft skin rendering; beloved for character-driven drama.
\* **Example**: "Family smiling in a living room lit by warm sunlight."
\* **Panavision C-Series**: Iconic anamorphic Hollywood lenses. Oval bokeh and horizontal blue flare.
\* **Example**: "Action movie scene with car headlights stretching horizontally at night."
\* **Canon K-35**: Vintage 70s–80s feel. Soft light bloom and dreamy mood.
\* **Example**: "Lovers dancing in a hazy sunset meadow."
\* **Helios 44-2 / Petzval 85mm**: Swirling "vortex" bokeh. For highly artistic, distinctive looks.
\* **Example**: "Mystical, dreamy scene of a fairy appearing in a forest."
**🔍 Cine Master Shot: Optical lens reference**
\| Lens category | Lens model | Main traits and recommended use |
\| :---- | :---- | :---- |
\| **Digital precision** | **Arri Signature / Zeiss Ultra Prime** | Sharp, modern texture, when you need realistic rendering |
\| **Portrait & drama** | **Cooke S4/i / Canon K-35** | Soft skin tones, warm feel, character monologues |
\| **Cinematic anamorphic** | **Panavision C-Series / Hawk V-Lite** | Oval bokeh, cinematic flare, wide scale |
\| **Artistic & special** | **Lensbaby / Helios 44-2 / Petzval** | Swirl bokeh, intentional distortion, dreamlike mood |
\| **Hasselblad only** | **XCD series (90mm V / 38/55mm V etc.)** | Maximum resolution when paired with Hasselblad body |
\| **Special purpose** | **Laowa Macro** | Extreme close-ups of small objects or eyes |
**📏 Cine Master Shot: Focal length guide**
You can choose from 8mm (ultra-wide) to 200mm (telephoto), or enter a value directly.
\| Type | Value | Visual effect (usage) | Example shot |
\| :---- | :---- | :---- | :---- |
\| **AI auto** | **AUTO** | AI analyzes scene and composition for optimal focal length | For new directors or quick drafts |
\| **Ultra-wide** | **8mm** | Extremely wide view, distortion for dramatic space | Cathedral interior, vast planet |
\| **Wide** | **18mm** | Landscape and people with strong sense of space | Tense room, city establishing shot |
\| **Standard-wide** | **35mm** | Slightly wider than human vision, natural storytelling | Street snap, full-body shot |
\| **Standard** | **50mm** | Closest to human perspective, honest depiction | Everyday life, dialogue |
\| **Short tele** | **85mm** | Portrait standard; soft background (bokeh), clear features | Emotional close-up, interview |
\| **Telephoto** | **200mm** | Compress distance, pull subject and background together | Sports expression, sniper POV, paparazzi |
\| **Custom** | **Direct input** | Fine-tune angle between the above values | When you want 45mm, 135mm, etc. |
**💡 Director tip: "Widen the space or narrow the emotion"**
\* For **grandeur of space**, choose **18mm or shorter**. Background recedes and the subject looks smaller while the world feels huge.
\* To focus on **character emotion or beauty**, choose **85mm or longer**. Background blurs and only the person holds the viewer's attention.
## Step 3: Lighting Style
After setting the gear, the most important step is designing the light. The lighting style can make the scene feel like a thriller or a romance.
Choose a lighting preset that defines the mood.
* **Natural light**: Natural, Golden hour, Blue hour
* **Studio**: Softbox, Backlight, Cinematic
* **Mood & color**: Moody, High key / Low key, Amber / Crimson / Emerald, etc.
* **Special effects**: Volumetric, Black & white
\| Lighting style | Traits and emotion | Director's recommended scene (example) |
\| :---- | :---- | :---- |
\| **Natural** | Real-world light, realistic and comfortable | Documentary-style, peaceful afternoon |
\| **Golden hour** | Warm, golden sunset light; romance and nostalgia | Lovers parting or reuniting, beautiful flashback |
\| **Blue hour** | Cold, still blue after sunset or at dawn; solitude | Lonely walk at dawn, cold mystery |
\| **Backlight** | Strong light behind subject; rim or silhouette | Hero's entrance, mysterious figure |
\| **Softbox** | Soft, even light; minimal shadow, flattering | Beauty close-up, interview |
\| **Cinematic** | Classic film lighting; balanced contrast | Dramatic conflict, general feature look |
\| **Moody** | Dark, heavy; strong shadows for inner psychology | Crime thriller, character in distress |
\| **High key** | Overall bright, minimal shadow, positive energy | Comedy, fairy-tale mood, hopeful morning |
\| **Low key** | Most of frame dark, specific areas lit; tension | Noir, horror moment |
\| **Volumetric** | Light rays in air; mysterious and dimensional | Light through fog in forest, light through church window |
\| **Color filter (amber/red/etc.)** | Tinted light for distinct mise-en-scène (e.g. crimson for intensity) | Cyberpunk (violet), war/anger (red), sci-fi (emerald) |
\| **Black & white** | No color, only contrast and texture; classic and artistic | Classic film homage, philosophical scene |
## Step 4: Exposure settings
Adjust brightness and depth of field for the image.
Exposure is not just brightness—it completes the "physical texture" of the image.
* **Aperture**: Controls background blur (depth of field).
* **Shutter**: Controls motion blur or sharpness.
* **ISO**: Sensitivity; fine-tune overall brightness.
\_※ Click the \_\*\\\[AUTO\\]\*\* button next to each setting for AI to compute optimal values.
**📸 Cine Master Shot: Exposure settings guide**
\| Setting | Role (in director terms) | Effect | Example |
\| :---- | :---- | :---- | :---- |
\| **Aperture** | **"Where the eye focuses"** | **Low (F1.4\~2.8)**: Soft background, subject stands out **High (F8\~11)**: Sharp from subject to background | **F1.8**: Single tear on protagonist **F11**: Full detail of a huge wall |
\| **Shutter** | **"Movement in time"** | **Fast (1/1000)**: Freeze the moment **Slow (1/30)**: Motion blur, dreamy | **1/500**: Explosion debris **1/15**: Soft blur of dancer under streetlight |
\| **ISO** | **"Sensitivity to light"** | **Low (100\~400)**: Clean, sharp **High (1600+)**: Bright in dark (more noise) | **ISO 100**: Beach at noon **ISO 3200**: Dark dungeon |
**🛠️ How to use exposure**
1. **\\\[AUTO\\]**: If you're unsure about the exposure triangle, click **\\\[AUTO\\]** next to each setting. AI balances values for your lighting and lens.
2. **Cheat sheet preview**: Use **\\\[Cheat sheet preview\\]** (top right) to see how current settings affect the image.
3. **Sliders**: Move sliders to fine-tune brightness and depth of field.
**💡 Director tip: Settings by situation**
* **Emotional portrait**: Open aperture to **F1.4**, **ISO 200** for clean image. Background melts away; only the face stands out.
* **Fast chase**: Set shutter to **1/1000** or faster for sharp action.
* **Gritty noir**: Raise **ISO** for grain, or slow shutter for uneasy mood.
**🎞️ Cine Master Shot: Final step**
## Step 5. Output settings & custom prompt
* Set the "frame" of the scene and give the AI final creative notes.
**Aspect ratio**: Choose a frame that fits the genre.
**16:9 (Landscape)**: Standard cinematic widescreen; ideal for wide backgrounds or dialogue.
**Resolution**: Determines sharpness of the result.
**1K (HD)**: Good for quick previews and web sharing.
**Custom prompt**: Add creative details—costume, action, weather—beyond the technical setup.
* **Director example**: "Man in a torn leather jacket," "Falling snow," "Strong neon sign light."
* **Batch number**: How many images to generate per click.
* Generating several at once and picking the best is a common workflow, but it uses more tokens.
**"The camera is ready and the light is set. Time to hit Generate."**
## Step 6. Generate
When everything is set, click the black **\\\[Generate\\]** button at the bottom.
**📊 Output settings summary**
\| Item | Options | Recommended use |
\| :---- | :---- | :---- |
\| **Aspect ratio** | 16:9 / 1:1 etc. | Cinematic (16:9), SNS/poster (1:1) |
\| **Resolution** | 1K (HD) etc. | Quick preview and digital sharing |
\| **Custom prompt** | Free text | Final creative direction to the AI |
\| **Batch number** | Number | When selecting the best from several variants |